How to produce your daily podcast
Creating, editing and publishing
Published at July 19, 2022±30 minute read6979 words
At the moment of this writing, I'm closing my daily podcast. With more than 500 episodes (and a few bonuses), this has been a crazy ride and I am going to talk about its emotional entails it in a different post.
This one is a tutorial on how to make your own daily podcast.
The topics I'll cover are:
Motivation
There are a lot of reasons to do a podcast, especially a daily one. We've been overwhelmed by all kinds of publications in audio style — from Youtube 4h long unedited interviews to intricate and perfectly built weekly audiodramas.
So, whenever you think why to throw your ideas in an already saturated world, STOP THINKING. Go with the flow. Write first, edit later.
This topic isn't about thinking if your motivation is enough for starting such project, it's to motivate you to go do it -- and to hell with the nonbelievers.
If we were talking about drawing, the weekly, well edited and full of effects podcast would be a fine painting. Daily podcasts are gesture drawing, quick jots on the paper resembling a sillouette.
In music, a daily podcast is a riff, while more complex podcasts a fully produced song. In film, an Instagram story vs a short-lenght movie. In writing, a note vs a third-draft short story.
I think you got the point.
Catharsis
Of course this is my particular view on the daily podcast.
For me, it is a media for expression and testing. It's ok to not know exactly what you are talking about, to open yourself to vulnerabilities and to not reach a lot of people.
In my opinion, if you are moving a heavy production, fully scripted and edited, pre-ready, larger body of work you are splitting in daily bits and publishing... well, it's still a daily podcast, but not my view on daily podcasts.
Go out there and do your daily podcast, put your ideas out and make it happen, as shittier as it might be in the beginning.
It's recorded
The only no-go I can warn you about is simple: it's a recording on the internet. It's very hard to unrecord things and unpublish them after they've been online. So, if you are making a daily podcast and telling to whoever listens your opinion on a subject, expect backlash. People are mean on the internet and they will critique a thousand times before the first compliment comes.
Remember that everything you put online is hardly ever deleted. Someone, somewhere, will have your downloaded file, a backup of something shameful you'd rather not have said.
On the other hand, if you are feeling good about your opinions and want to stick with them, be my guest. You can always publish a mea-culpa podcast later — but these reach only 10% listeners of the original polemic episode.
Pre-production
Equipment
STOP.
Close that Amazon tab. Do not — I repeat: DO NOT — browse Ebay for used professional microphones. Take your hand out of the keyboard and put you credit card back in your wallet, you don't need that fancy software.
Crisis averted, we can start by the beginning: you do not need new equipment to record any podcast, especially a daily one.
I assume you have a smartphone. Even if you don't, the good and old flip phones from the 2000 already came equipped with audio recording capabilities. You do not need a professional microphone costing hundreds (or thousands) of your local currency. Use what you have at hand first.
This is a common rookie mistake (and by rookie I include myself). We all love shiny new things and they are widely available. Most of them are either crap or absolutelly amazing. Either way, unnecessary.
If you have a cellphone, you already have a great microphone in your hand.
Recording audio is much more about set and setting than the actual microphone quality. Having a quiet environment, without echo, is more than enough to start your daily podcast experience
Script
STOP.
No, this time I'm kidding, it's completely OK if you want to script your daily podcast, but... well, good luck. It will be way more demanding than doing it from the heart.
I know many of you really want to do a better job than just an audio-format journal, with you blabbing about stuff for a few minutes and that's all. The problem is that script brings two issues that are hard to come around.
First, you need to write the actual script. Sitting down and writing is not as easy as it looks like, especially because writing demands editing — and that's a completely different monster. You will write a phrase that sounds great in your mind but, at the time of recording it might sound weird. So you'll want to edit it. After a few hours, you will notice a simple 10 minutes episode became an essay of 40 minutes that you took 3 hours to complete.
Second, you will probably read your script while recording and that's not only something the listener can recognize, it's also boring. It's weird to listen to people reading from perfectly crafted text, and even weirder when they try to add spoken interjections in the text for the actor — in this case, you — to read.
That's why real actors do out-lout script-reading sessions. They can hear what each other says and adapt as they go, with the scriptwriter or director, to make it more natural and better for the listener/watcher.
I discourage scripts in daily podcasts because, in my opinion, they take a lot of the spontaneity off.
As I said before, for me this activity is meant to be cathartic, artistic, experimental. It's nice to do weird stuff sometimes, but most of the times you will have not much time and no one other than yourself to judge the quality of your work, and we're awful self-editors.
Try not scripting and see how it goes. Don't let you be your own judge, publish it even if shitty and keep going until you find your style.
On the other hand, I do recommend having some kind of theme before you start recording. In my experience, for instance, I asked listeners to add anonymous questions to a special website and I answered them while recording. It was not a proper script, but it was a heading I could follow so I'd not lose my track and could know when it was time to end the recording.
Production
Setting
What do you need to record a daily podcast in terms of setting:
A quiet place
It can be your room, or your car. The important part is: make it quiet but not empty — the more furniture, the better, especially cloths and foams (like sofas or beds). This reduces echo a lot. A car is nice because, well, it’s mainly a couple of sofas on wheels.
If you don't have a quiet place or you are a minimalist living in a 100 square meters room with just one mattress, you will need to improvise. A colleague from Folha de S.Paulo newspaper started recording professional podcasts inside his closet — quiet, full of cloth, zero echo. He was also gay, so this was a common joke he’d tell friends about coming out.
DO NOT BUY EQUIPMENT FOR THIS. Improvise, cover yourself with a blanket, record under the bed, do your jumps.
Software and Hardware
You, of course, did not buy equipment for this, following my tips, right? So all you'll need is some recording app in your phone. Any will do — independent of brand of phone.
There are tons of free ones and even, depending on the phone, native audio recording software.
If you can (and want) to get a little bit more technical, look for apps that record in wav and not mp3. The latter is a compressed format and it is not so easier to save later if something does not sound good. Remember, though, that nothing can save a badly recorded audio.
After you recorded in your phone, I recommend using a free audio editing software like Audacity. It comes in many languages (although I recommend English, I'll explain later) and it has a lot of tutorials on how to use it online, both in text and video.
There are a lot of great, professional podcasts, that started in Audacity. I started my podcast on Adobe Audition (when I had an Adobe subscription) and changed to Audacity without regret. It's a great — although a little clunky — piece of software.
"But Angelo, I want to record using my laptop, not my phone"
That's OK. Audacity handles recording, editing, mixing and exporting. It's a good bet, I assure you, and also keeps your money in your pocket.
Recording
So, you got some themes written down, charged your laptop, got your recording app ready and put some whisky in the kids milk so they'd be quiet. It's time to sit and push the record button.
You can do this in two ways:
- Record daily, edit daily, publish daily
- Record a week's worth of podcasts, edit them in batch and schedule publishing.
I've tried both and will give you my impressions.
Daily everything
It's really nice to record a podcast a day, having the subjects really fresh in your mind. It's also, a daily chore you have to commit to.
I started my podcast doing that: at the end of every day I'd get my laptop ready for recording and would produce a 5 minutes episode. This took, usually, 45 minutes each night.
45 minutes: finding a quiet place, readying the equipment (a laptop and a microphone I had from old adventures), starting the recording app, doing the actual recording, listening to see if everything was OK, proper editing, exporting, uploading, writing info about the episode on the publishing website, and finally sharing in social media.
If you have this kind of time and energy to spare, this is the best way to do it. Also, your listeners will know they'll have a fresh episode every morning waiting for them.
I didn't have that energy, so I moved on to...
Batch production
Every Sunday, I'd get my equipment prepared to record at least 7 episodes — a weeks worth. That way, I could spend less time setting up equipment, could block a time on my calendar I'd be 100% invested in the recording and could have some social life during the week.
This worked like a charm — especially because I had the themes pre-written. I'd list them and know what those episodes were about, then just recorded them all, one after another.
After that, I'd start the most time consuming time of the process: editing. At least I'd be in an editing mood, and doing it over and over again made processes faster. I was learning the editing software better and knowing how to use with more agility.
The publishing part also got easier and faster: I'd open the website once, upload all files, write the episode information (copying and pasting what would repeat) and schedule the episodes, one for each day.
After the 3rd season, though, I stopped scheduling like that and just published a batch of episodes at Sunday night (as I realised this made little diference for the readers). Again, it's all about energy: if you have it for scheduling, do so. If not, no judgement.
Post-Production
Editing
There are two ways to do this:
- Do it yourself.
- It's going to take time. A lot.
- You will learn new a new skill.
- You'll be able to boast "I did this myself"
- Hire a professional to do it for you.
- It's going to cost money. A lot.
- If you have the bucks, I highly recommend Felipe Gomes, my go-to podcast editor. He was responsible for Capotes Marrons and some episodes in Cronofobia (especially Hospício Lotado series)
Really, you should do it by yourself. Editing this kind of podcast, especially with the tools we have on our hands, is easy-peasy. It takes a lot of time to get used to it but, when you get the hang of it, you'll do it in no time. Kind of any new skill in the world.
Sure, you can pay someone to do it for you, but most of the podcast editors I know (and I know a bunch) don't take that kind of job because of the high context-switching they need to do. Most of them have costs that start in the 30 minutes mark, and you'll be doing 5/10 minutes episodes. It's not worthy for most of them to charge less and it's not great for them to change the way they work because of you and your special project.
So, from now on, I'll presume you will edit it by yourself.
Do it yourself
Important: I don't know the right names for stuff. I do this as a hobby, so I don't care about the difference between editing and mixing. I don't care if it's a filter or an effect. If you want to correct me, submit a pull request with the corrections.
Again, there are two ways of doing this.
- Manually
- Magically
By manually I mean this workflow I used to do:
- Add the recorded file to Audacity
- To avoid destructive changes (see below):
- Duplicate the track
- Mute and lock the first track
- Start working on the duplicated track
- Apply effects and filters
- Noise gate to avoid background noise
- Noise reduction effect to remove more background noise
- Go through the file, removing pieces I don't want, cutting silences short and removing "ummm" and "aaaas".
- Apply more effects and filters
- Normalizer to make it sound better
- Compressor to make it sound better
- Filter Curve EQ make it sound better
- Bass and Trebble to make it sound better
- Limiter to avoid peaking audio
- Save the project
- Export as WAV
As you probably can see, I have no single clue why I do most of that. These steps were recommended by colleagues to make it sound better, so, I don’t know exactly what each thing does. That will be also your journey into discovery: finding what effects make your voice sound better.
As I was repeating this task a lot, I decided to come up with the second way to do it.
Magic!
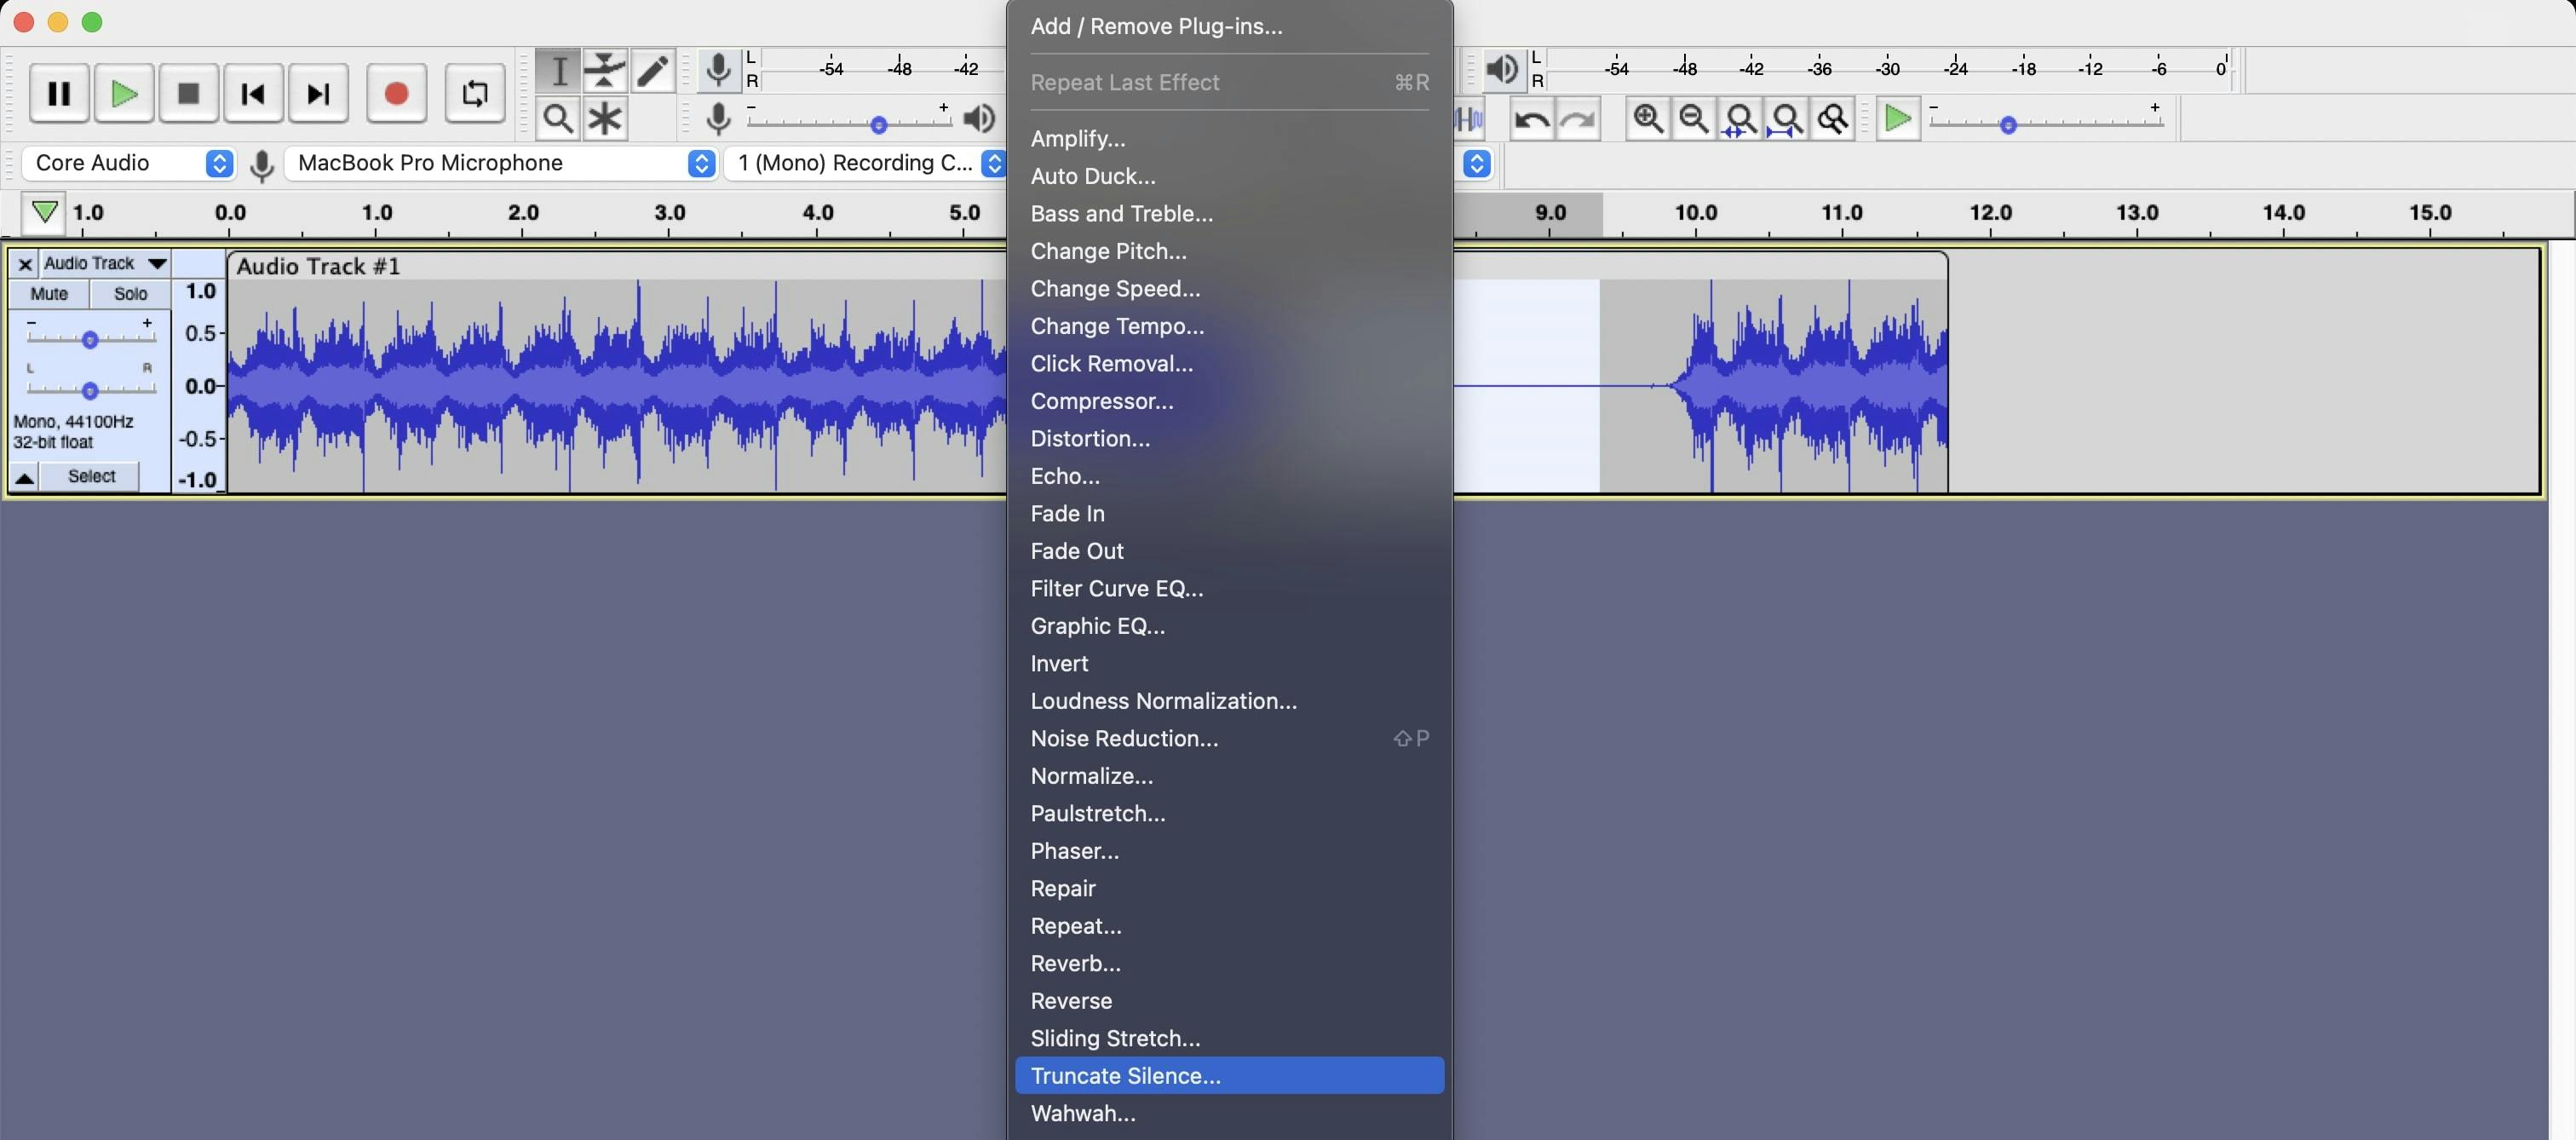
Audacity has a feature called Macros. It's basically a tool that lets you record commands and play them by hitting a single button.
It's possible, for instance, to record a boring, repeated behavior, and just play it in every file you have.
Do you see where I'm going?
This whole process I described before is done with minimal difference between runs. It's almost perfect for automation, as the variables hardly change.
Of course, I take into account that the audio will be recorded with the same amount of silence, the same microphone, the same host voice. Knowing I record in my living room with my own voice makes this process very possible.
I, differently than Brazilian Mr. M., will teach you how to do magic yourself. I'll even share my recipe below.
I have two Macros configured in my workflow: Duplicate.txt:
SelectAll:
Duplicate:
MuteTracks:
ShiftDown:
TrackMute:
SelTrackStartToEnd:
Macro_Podcast:
and Podcast.txt:
Save:
Noisegate:attack="100" decay="300" gate-freq="0" hold="50" level-reduction="-24" mode="Gate" stereo-link="LinkStereo" threshold="-40"
NoiseReduction:Use_Preset="<Factory Defaults>"
TruncateSilence:Action="Truncate Detected Silence" Compress="50" Independent="0" Minimum="0.3" Threshold="-40" Truncate="0.3"
Normalize:ApplyGain="1" PeakLevel="-0" RemoveDcOffset="1" StereoIndependent="0"
Compressor:AttackTime="0.2" NoiseFloor="-40" Normalize="1" Ratio="2" ReleaseTime="1" Threshold="-5" UsePeak="0"
FilterCurve:f0="20" f1="98.323265" f2="234.18214" f3="500" f4="997.72628" f5="2945.5193" f6="22050" FilterLength="8191" InterpolateLin="0" InterpolationMethod="B-spline" v0="-21.619049" v1="0.095237732" v2="-1.8095245" v3="0" v4="-0.28571701" v5="3.5238094" v6="5.4285717"
BassAndTreble:Bass="5" Gain="0" Link_Sliders="0" Treble="0"
Limiter:gain-L="0" gain-R="0" hold="10" makeup="No" thresh="-0.1" type="HardLimit"
ExportWav:
Save:
As you can see from these files, they are just a bunch of commands for the software to follow. I split it up for personal reasons, but this could be on a single file without any issue (it's nice, though, to show you can make different Macros and call them from other Macros by using Macro_{NAME OF MACRO} command, like in the end of Duplicate.txt).
As some of you are not programmers or audio enthusiasts, I'll teach you how to work with Macros using Audacity graphical user interface. Easier to do, but a little clunky. Let's do my workflow together.
Know my origins
First of all, I'm using Audacity 3.1.3 on a Mac. This is important, as features might change places in different versions — although the macros are here since a long time so I bet you won't have problems with them.
Speak my language
Another important thing is: use Audacity in English. I suppose that, by reading this text, you know English enough to work in the software. My reason, though, is because this guide will use English commands and English-titled tools. Sadly Audacity doesn't follow a very simple guideline in programming:
Translate your UI, not your code
Then, when exporting/moving the Macros from an English Audacity to, let's say, a Brazilian Portuguese one, most Macros are lost in translation.
Read the map
I could explain step-by-step how Macros in Audacity work, but their official docs do it way better than I would ever do.
So give a shot at them and visit their documentation clicking below. It's not a lenghty read and it will give you the info to better understand what I'm saying here.
Basically, what you need to do is simple: chain commands that you would usually repeat ad-infinitum in a Macro and use it instead of them.
Hold my hand
I, for instance, always clone my track after recording so I can practice non-destructive editing (see above chapter). This Macro, below, is somewhat in plain English (you can even copy it and paste it in the Macros folder — search the wiki for the location in your system — just remove the last line):
SelectAll:
Duplicate:
MuteTracks:
ShiftDown:
TrackMute:
SelTrackStartToEnd:
Macro_Podcast:
From start to finish:
- Select all tracks (usually, one)
- Duplicate it
- Mute all the tracks
- Select only the track down (the duplicated one)
- "Click" the mute button (they were all muted, so it's going to unmute it)
- Select track from start to end
- Apply the Macro called "Podcast"
This is already a good deal of repetitive work I'm not doing. It saves me a lot of time already.
Auto-editing
In all of my workflow, this is the most mindblowing one. This one saves me HOURS of work.
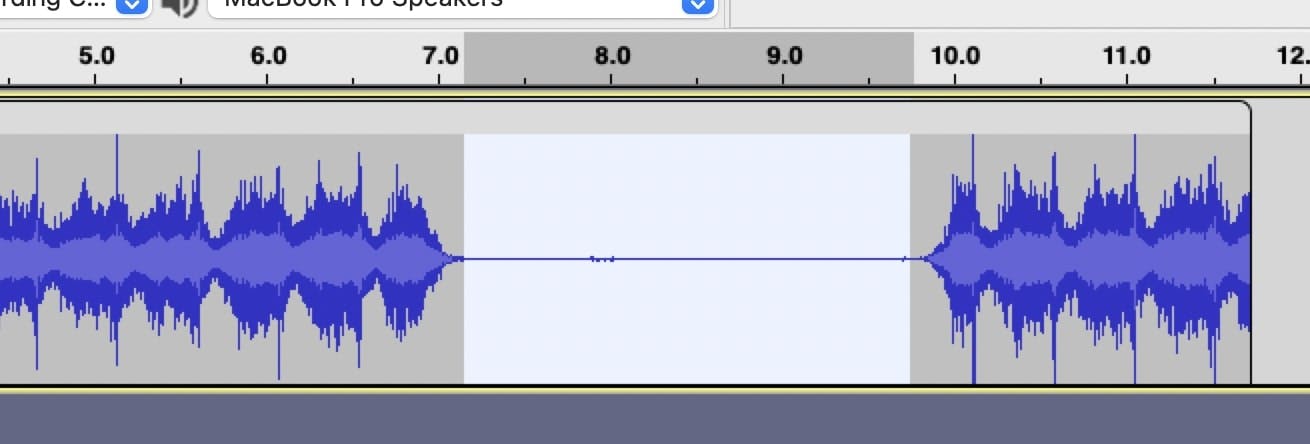
Instead of manually cutting every single weird silence, I use Audacity truncate silence tool to do it for me. It, as the name says, removes the silences and glues the remainders together.
To make sure my silences are actually silences (and not low-humming noisy backgrounds), I use the noise reduction effect. In order to use it, you select a part of your track that has only background sound (it's nice even to record just the background, with no voice, for a few moments just to be able to get a good sample later)
Then, click on Get Noise Profile button.

That means that the software will use this audio as sample of what's noise. Anything that goes over it its not noise, but content.
Eyeball the numbers in the dialogue (more on this in the next section), test and undo if it sounds robotic. Remember: nothing saves a bad recording, so focus on getting it clean before getting to the editing table.
You might need to apply noise reduction twice to see silence appear.
After doing that, apply the effect Truncate Silence:
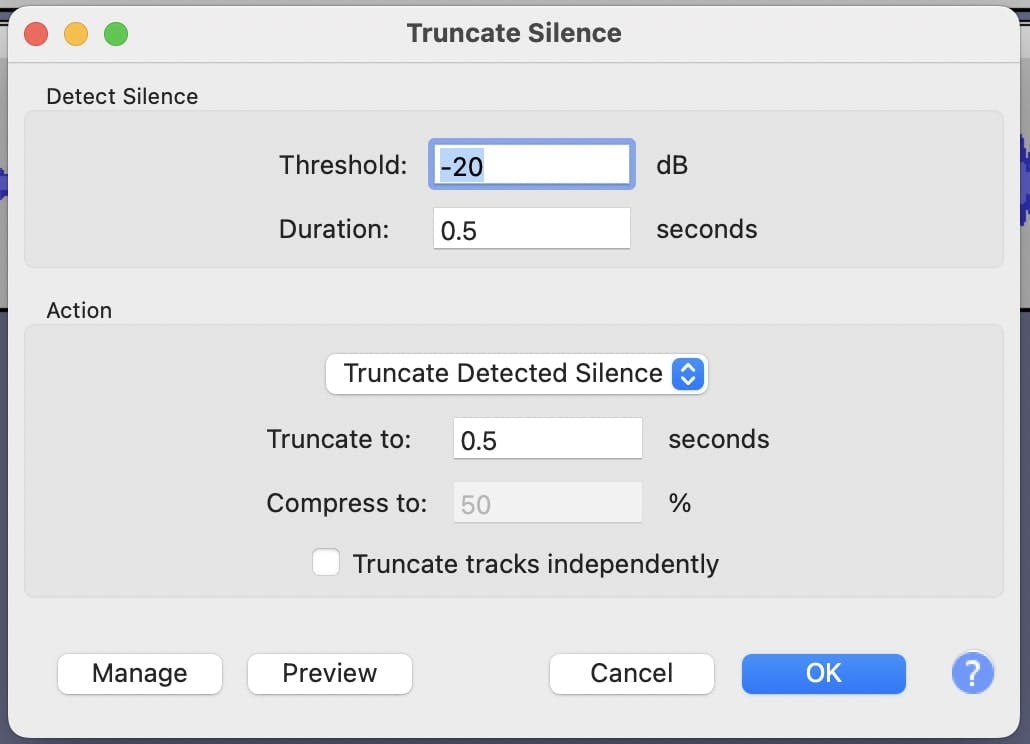
Again, I have absolutely no idea what those numbers mean. Eyeball it and make sure Audacity is not cutting your voice, but only silence.
Polishing & treatment
If you remove Noise Reduction and Truncate Silence, all the other things that happen in my Macro are very unknown to me.
This is the hardest part of all the process, in my opinion. I find it so difficult to make my audio less recorded inside a bathroom and more professional that I asked some friends that work in this business to tell me what I needed to do in order to make it sound better.
Then, I turned their advice into the Macro I showed before.
So, I'm truly sorry for not being able to give step-by-step explanations on why I chose 10 over 20 in some configuration. I'd love some PRs in this article, if you end up knowing what I am talking about.
Go out there, ask friends for help, ask Reddit, ask Google.
Too shallow but still wet
Summarizing a lot, what I do in my Macro is:
- Make sure I don't have any clipping parts (Noisegate)
- Reduce noise (NoiseReduction)
- Truncate silence (TruncateSilence)
- I have no clue what this does (Normalize)
- I have no clue what this does (Compressor)
- Make my voice sound more deep and without too much treble (AKA: I have no clue what this does) (FilterCurve)
- Wait, hadn't the last setting edited my bass and treble already (I have no clue what this does strikes back) (BassAndTreble)
- This limits the highest volume to a threshold (so it doesn't sound too loud on some parts and not that much in others) (Limiter)
- Export file as
wav - Save file.
From start to finish
After recording, I simply select the part that's background noise and run the Macro.
That's it.
I don't do anything else: no more editing, no more cutting, nothing.
If any setting went wrong and made my audio sound like shit, I simple ctrl-z and run the Macro again. I rarely have to micromanage and change Macro settings on the fly.
That's another face of the make this fast, make this stupid mindset of daily podcasting.
Publishing
When you get your little, pretty podcast ready for consumption, you'll need to upload it somewhere so it can actually reach people, right?
There are several ways to host a podcast, but this far in the process you might be tired, so it would be better if someone did that for you, right?
Well, I'd like to introduce you to Anchor
This could be a sponsored post, but it's not. Anchor just... does everything needed. And it's easy to use.
You need to create an account there, which will be attached to your podcast (so, multiple podcasts = multiple accounts), and start uploading your files.
They offer a lot of good things for free, like the possibility to broadcast your podcast to Spotify (the company that owns Anchor). It's possible to broadcast to Apple Podcasts and Deezer, but that takes a little more work (and you can find a bunch of tutorials on how to do that online).
The best thing about Anchor is their ease of use. It's really simple to update an audio, add a background music, even record and edit straight in the app is nice — although not perfect.
There's not much more to be said. Anchor is the best current option for podcast free hosting and publishing.
Conclusion
This half-baked guide is the best I could do while not getting too technical.
I hope this can steer your creative process and not make recording your daily podcast another really boring chore.
I'm sorry about the lenght and the lack of details. Please hit me up on twitter, instagram or telegram (at the bottom of this page) for comments and updates. If you want to add information here, submit a pull request or open an issue. I will love to add your comments and information to the article and, obviously, tag you as the source.